How To Install An M.2 Drive?
M.2 is one of the most exciting technologies currently available and represents the future of storage in computers. M.2 drives do not require any wiring for data and power and take up almost no space in a system. M.2 also allows you to use NVMe drives, which are the fastest storage drives currently available. This guide will go over the differences between different kinds of M.2 drives as well as how to install them in your system.
The first thing to know is that not all M.2 drives are the same. M.2 is a connection type, not an indication of speed. Some M.2 drives are the same speed as a conventional SSD using AHCI (more on that later), while others use the newer and faster NVMe standard. It’s also important to note that not all M.2 drives will fit in all M.2 sockets. There are 2 main connector types for M.2 drives; key B and key M. Key B is used primarily for non-NVMe M.2 SSD’s, whereas key M is primarily used for NVMe capable drives. There are a few other key types, but they are fairly rare and obscure so we won’t go over them here. There are also different length M.2 drives, but those are also uncommon. It’s also worth noting that some M.2 drives may have both key B and M and will fit in a socket keyed for either. However, key M M.2 drives are always NVMe. With only a few exceptions, most boards currently available can support either key M NVMe SSD’s or key B (or B + M) non-NVMe SSD’s.
NVMe
Before getting to how to install an M.2 drive, it is worth going over why NVMe is a big deal. Back in the early days of computing, AHCI (Advanced Hardware Configuration Interface) was developed to allow operating systems to use mechanical drives. At the time, flash storage like SSD’s did not exist, so AHCI was never intended to work with them. Eventually, SATA reached version 3, with a maximum of 6 Gbps transfer speeds. Unfortunately, this is probably as fast as it will ever get on its own, as the AHCI standard has reached its limit. That’s where NVMe comes in. NVMe was designed from the ground up with flash storage in mind and is only going to get faster in the next few years. NVMe uses the PCIe bus, the same bus that video cards use to achieve fast data throughput. Current M.2 drives can get up to 32 Gbps transfer speeds, or 6 times as fast as a SATA 3 SSD. Because of this, NVMe drives make the best boot drives for a new system.
Installing the drive
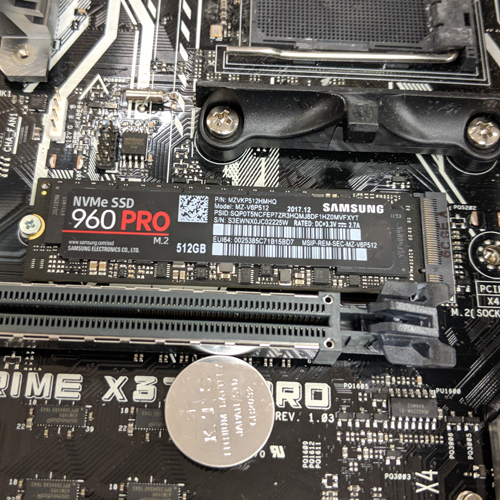
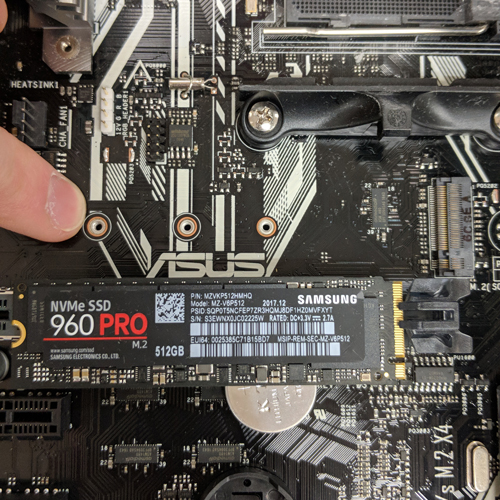
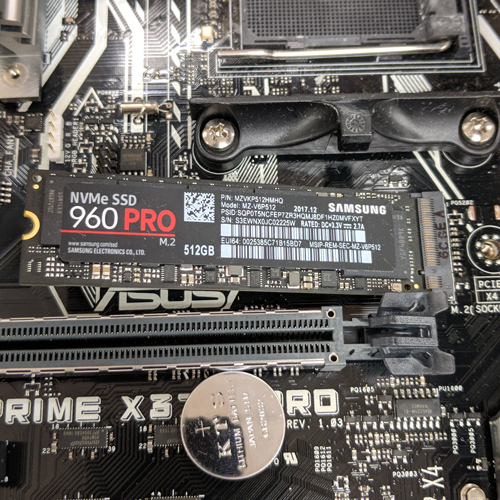
Now we’ll go over how to install an M.2 drive. Fortunately, this is a very simple process since they don’t require any wiring. The only things you will need are a small Phillips head screwdriver and possibly a 5mm hex screwdriver, but not every system will require this. The first thing to do is to find an open M.2 socket. Depending on the motherboard, there may be up to 3, with some hidden below the video card or under parts of the motherboard. If you aren’t sure where to look, check the motherboard’s manual. Some boards provide a heatsink with pre-applied thermal pads for cooling. If your board uses this, make sure to take advantage of it as it will definitely improve performance. In the accessory bad that came with your Velocity Micro order, there should be a small bag of screws used for mounting an M.2 drive. Keep in mind that they are very small and easy to lose. If you aren’t sure what they look like, the motherboard manual will have a list of all parts and accessories that were included. Again, depending on the board, there will be a very small Phillips heard screw and possibly a small hex screw. Some boards may have one or both already pre-installed. Once you’ve determined if you need the screws and where you are going to install the drive, it’s time to connect it. If your board does not the hex screw pre-installed, install it now with the 5mm hex screwdriver. Be careful not to overtighten it. Most M.2 sockets have multiple spots for this screw, depending on the length of the M.2 drive. The most common length is 80mm, and most boards have a label beside each hole denoting the length. Now take the drive and line up the side with the gold contacts with the socket on the board, paying close attention to the notched cutout on both. Make sure they align properly when inserting. After insertion, the drive will not lay flat in the socket, but rather sit up at a 45-degree angle. The socket is spring loaded so that it pops up like this for easy removal. Gently push the drive down with your finger and align the semi-circle cutout with the top of the hex screwdriver. Now take the small Phillips head screwdriver and secure the drive down with the small screw. And that’s it, your M.2 drive is now installed. But that’s only half of the process to get it working.
If you plan on installing Windows to the M.2, the installation process is more or less the same, at least initially. If the M.2 is non-NVMe, then you shouldn’t need to do anything else post installation. If it is NVMe, go through the install like you normally would, but when you are installing all of your drivers you will need to grab an additional driver. The driver adds NVMe compatible code to the Windows storage controller. Without it, your NVMe SSD will only perform at about half of its rated speeds. You will need this driver even if you are using an NVMe drive as a storage drive. Another thing you should download is the manufacturer’s utility for monitoring the drive and updating its firmware. Updating the firmware is highly recommended. See our guide on keeping your SSD's healthy for more on that. One thing to note for Windows 7 users; if you plan on installing Windows 7 to an NVMe SSD, you will need to sideload the NVMe driver during installation or you will get BSOD’s on boot every time.
Finding the M2 slot
Inserting the drive