My motherboard is equipped with EZ Flash, how do I use it?
The below is recommended for users with XP systems only (this excludes users with Vista downgrade rights to XP).
- Download latest ASUS BIOS from support.ASUS.com and rename the BIOS filename to xxxxx.ROM
(xxxxx represents the motherboard model you used, eg. P4C800 BIOS is named p4c800.ROM), and save the file on a floppy disk or USB flash drive. - Reboot the system.
- When the system is at POST after reboot, hold down "Alt" + "F2" to view the following image. This will execute the EZ Flash utility. Insert the floppy disk with the latest BIOS into the floppy drive. Note: If you have not placed any floppy disk into the floppy drive, you will see a warning message stating "Floppy not found". If the utility can not find the correct files in the floppy disk, it will show "p4c800.ROM not found!" message. (Assuming the motherboard is P4C800)
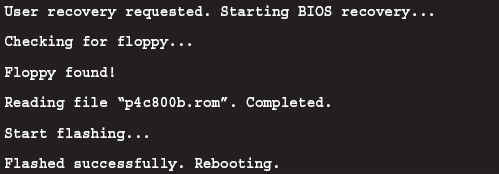
- The system will auto-detect whether the floppy disk contains the ROM file on the floppy drive. If there is no problem, the EZ Flash utility will begin auto-flashing the BIOS with the updated ROM file and reboot the system once it is done. The flashing process is illustrated below.