Microsoft has announced the latest iteration of Windows and in traditional Microsoft fashion, people are confused by the details. Windows 11’s biggest changes are immediately visible from the released screenshots; Microsoft has taken much of the user interface design work from the now-defunct Windows 10X, which was originally designed to run on dual-screen devices and compete more with Chromebooks and iPads. We’ll cover everything that’s changed in another article, but for now let’s answer the question that everyone is asking: what are the requirements for upgrading, can I upgrade, and what the heck is a TPM?
Windows 11 Basic Requirements
Microsoft has raised the requirement ceiling quite a bit for Windows 11.
- At least 1 GHz dual core CPU (more on that in a bit)
- 4 GB RAM
- 64 GB of drive space
- UEFI and Secure Boot capable
- Trusted Platform Module (TPM) 2.0 (also more on that later)
- DirectX 12 compatible graphics, either dedicated or onboard
- At least 9”, 720p display
At first glance, those don’t sound too bad, except that Microsoft has stated that, as of this writing, only CPU’s that are either Intel 8th Gen or AMD Ryzen 2000 series or newer will be officially supported by Windows 11. That unfortunately leaves out a lot of people with machines that aren’t really that old. Now, don’t panic yet. Microsoft has no plans of abandoning Windows 10 anytime soon, and much like the situation surrounding Windows 7, older systems may still be able to run Windows 11 even though they may not be *officially* supported. I suspect we’ll have more details on that closer to launch.
What is TPM?
Now for the part that is confusing the most people: TPM. Without getting too technical, TPM is a security technology that stores a hardware encryption key, usually in a dedicated TPM module, that prevents unauthorized access or changes to hardware or software. Microsoft cited a large increase in firmware-based attacks on computers in the last few years as the reason for this requirement, and TPM should help mitigate some of that, however that does potentially leave a lot of people in a tricky spot. Scalpers are already hiking the price of TPM modules and supplies are already lower since the announcement.
But here’s the good news: you may not need a dedicated TPM module. If your system falls within the requirements for Windows 11 then your motherboard more than likely supports either Intel’s Platform Trust Technology (PTT) or AMD’s fTPM (firmware TPM), neither of which require a TPM module.
So what is the TPM module for then if it’s not required? The difference is that the encryption keys are stored in the TPM module itself, if it’s installed, rather than the firmware of the board itself. Our advice is to not rush out and buy a TPM module, because you probably don’t need it and you will be paying more than you should for it, at least right now.
How do I find if my PC is TPM compatible?
First check if either Intel PTT or AMD fTPM is already enabled by opening a Windows PowerShell as admin and typing the command “get-tpm” without the quotes and press enter. Below are 2 screenshots showing what it will look like if TPM is either enabled or disabled.
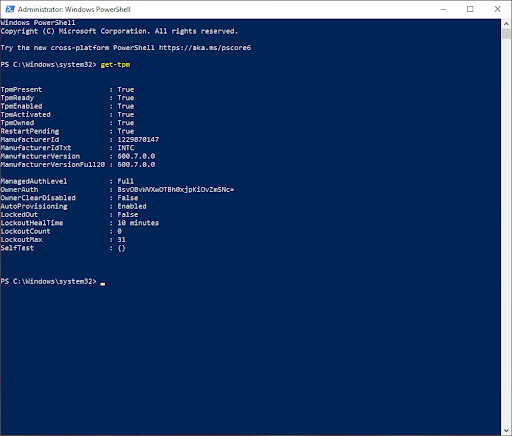
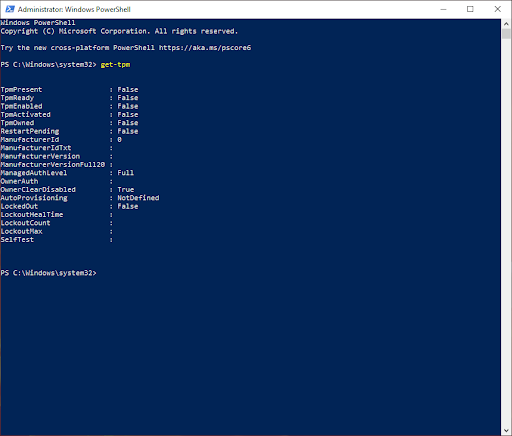
If the results say that TPM is enabled, then you’re ready to install Windows 11. However, if TPM is not enabled, you will need to go to the BIOS on your system and enable either PTT or fTPM by following these steps.
- Access the BIOS. This can be done by hitting the BIOS key during boot (usually F2) or using the Windows Advanced Start Menu
- Go to the Advanced section (this is the same on both Intel and AMD motherboards).
- For Intel, go down to PCH-FW Configuration and press enter. The option to enable PTT will be there. You will get a message box explaining the changes that are being made, just press okay and then press F10 to save and exit.
- On AMD, AMD fTPM should be at the top of the list under Advanced. Change it from dTPM to fTPM and press F10 to save and exit.
- Afterwards, you can run that command in PowerShell again to confirm that it worked.
There’s also no reason to worry about UEFI or Secure Boot, as any system that is capable of running Windows 11 will already be UEFI, and Secure Boot does not need to be enabled, the board just has to be Secure Boot capable.
Hopefully this has cleared up some of Microsoft’s mixed messaging on the requirements for Windows 11. If your system was built within the last 3 years, then you are more than likely ready for Windows 11.
Ryan Batson
Latest posts by Ryan Batson (see all)
- How To Upgrade to Windows 11 - October 6, 2021
- What’s New In Windows 11 - July 6, 2021
- What You Need To Know About Upgrading To Windows 11 - June 30, 2021
Seems eaier just to buy new! Which is a shame. My Velocity from 2016 is running great